基于Butterfly主题添加Artalk评论系统
最后更新时间为 2021-01-19 (暂停更新相关内容),主题目前已整合了Artalk评论系统,具体查看官方文档:https://butterfly.js.org/posts/ceeb73f/
Artalk: https://github.com/qwqcode/Artalk是一款简洁有趣的自托管评论系统
轻量
支持 SMTP / 阿里云 DM (Http API)
管理员防冒
提交频繁验证码
JSON 文件存储数据
需要服务器 (PHP7.1.X)
不就之前、白嫖半年的阿里服务器到期了(虽然不怎么用服务器)、就想白嫖一台、在群友的
推荐帮助 下、白嫖了euserv的一台1核1GB的ipv6服务器、反正闲着也是闲着、看到群友使用Artalk(基于PHP、需要部署在服务器)评论、我也想折腾一下(结果弄了我一晚上、呜呜呜 )、总结了一些在部署过程中的问题和步骤。示例: 留言板说到评论系统、之前用过 Valine、Gitalk和来比力、但是都不满意:
- Valine会被刷评论
- Gitalk会暴露密钥
- 来比力访问比较慢
所以就想使用 Artalk 评论系统 、看到还有 Giteecomment、有时间玩一玩。
注意:搭建Artalk: https://github.com/qwqcode/Artalk 需要:
- 一个域名(没有去freenom白嫖 我的教程)
- 一台服务器(没有下面有教程)
- 需要魔改Butterfly主题的文件(注意备份文件)
- 需要安装宝塔(当然你也可以不安装、只是我
没写教程而已其实是不会 )
服务器的配置
没有服务器
没有服务器、可以看这篇教程教你白嫖 euserv: https://www.shopee6.com/web/web-tutorial/euserv-order-v2ray-bt.html 、我是看这篇文章的(写起来太麻烦。。。)
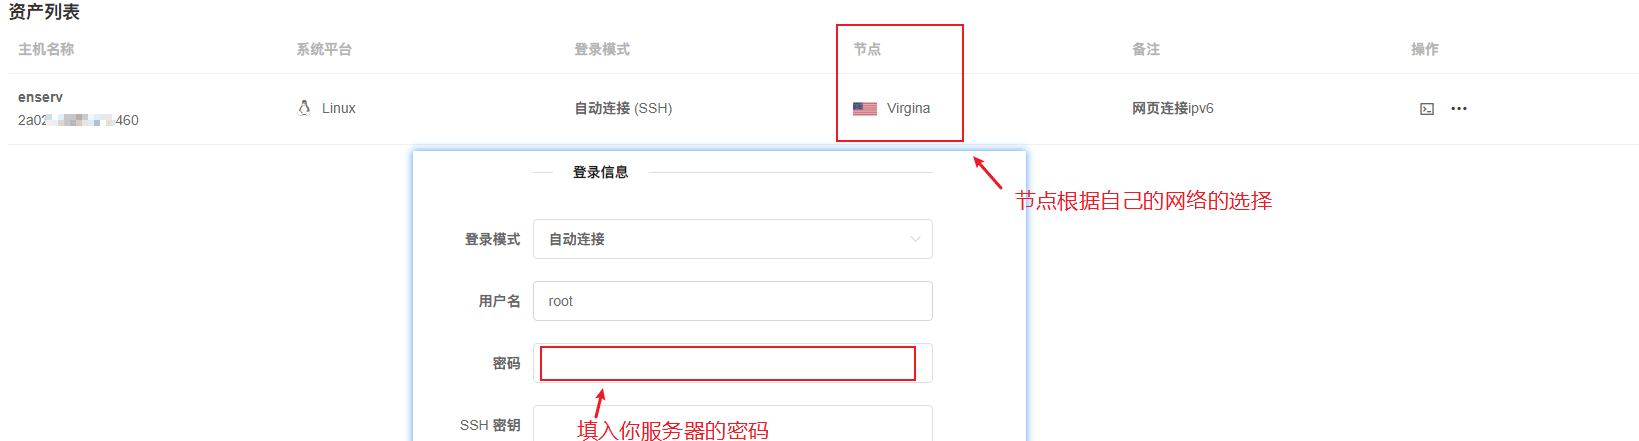
需要注意的几点:(帮助不大、还是看上面链接的教程吧)
heyterm https://www.heyterm.com/
如果你的网络不支持 ipv6 ipv6测试 、可以使用 heyterm 连接

连接成功之后
以下命令的作用,是设置你的VPS的DNS解析,让你的VPS可以访问IPV4网络并下载IPV4网络的资源,不设置是无法访问的
编辑
/etc/resolv.conf1
vi /etc/resolv.conf
将以 nameserver 开头的用 # 注释、并添加以下内容
1
2
nameserver 2001:67c:2b0::4
nameserver 2001:67c:2b0::6编辑
/etc/yum/pluginconf.d/fastestmirror.conf1
vi /etc/yum/pluginconf.d/fastestmirror.conf
修改如下的代码,将1改为0,如下
1
enable=0
更新
1
yum -y update
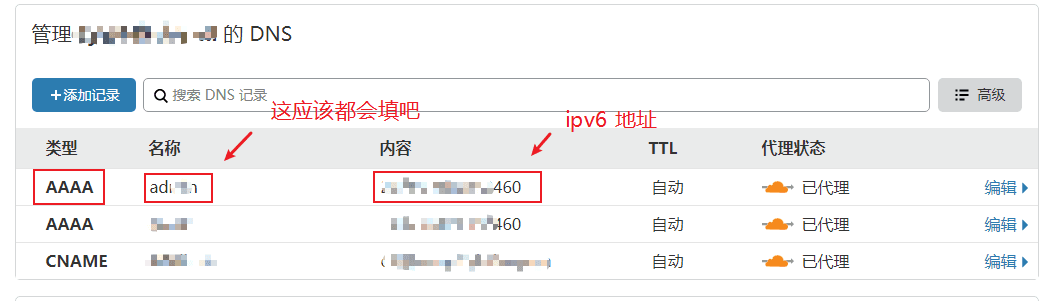
使Cloudfalre代理(为了让ipv4能访问到) https://www.cloudflare.com/ 也可以用 笨牛 具体操作自行搜索
安装宝塔(安装宝塔只是为了方便安装软件)
1
yum install -y wget && wget -O install.sh http://download.bt.cn/install/install_6.0.sh && sh install.sh
如果显示安装失败就再执行上面命令安装直到显示账号密码
接着输入
bt、将端口修改成8080宝塔面板的登录地址就是你的cloudflare设置的域名:
xxx.xxx.xxx:8080/你的面板目录
如果白嫖或者配置失败、建议还是去买个服务器吧
有服务器
进入服务器终端 安装宝塔
1 | yum install -y wget && wget -O install.sh http://download.bt.cn/install/install_6.0.sh && sh install.sh |
安装完成之后通过链接进入宝塔面板
宝塔的配置
在软件商店中安装 Nginx 1.18.0 和 PHP-7.4、再进入 PHP 管理页面,在禁用函数中将 putenv 删除
部署Artalk
安装和配置
1 | cd /www/wwwroot |
若在出现报错 Warning: putenv() has been disabled,检查禁用函数中是否还存在 putenv。
按照 注释 修改 /www/wwwroot/ArtalkServerPhp/Config.php 的配置
1 |
|
如果是euserv服务器、在邮件通知 中修改 on' => false, // 总开关 、因为会卡
宝塔面板左侧 文件 中 /www/wwwroot 路径下 更改 ArtalkServePhp 文件夹的权限为 755,所有者 www,并应用到子目录。
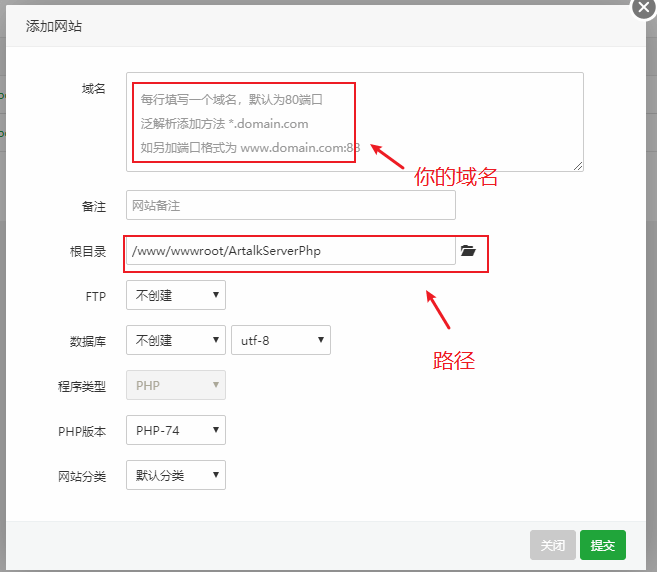
添加站点
宝塔面板左侧 网站 中点击添加站点
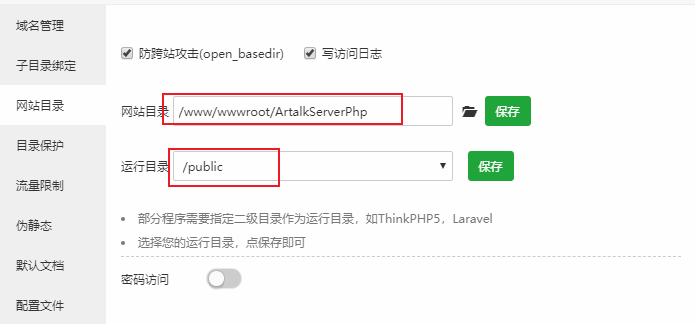
设置 中 修改一下运行目录
当然SSL证书相关的问题自行搜索啦:通过Cloudflare进行解析的域名可以在Cloudflare中申请-> SSL/TLS -> 源服务器 -> 创建证书、宝塔面板左侧 网站 - > 设置、点击 SSL 选择其他证书、复制密钥和证书进去
直接访问你Nginx添加站点的地址、如果显示以下内容就说明部署成功了(如果报错、请检查上面步骤是否正确)
1 | Artalk Server Php v0.0.2 |
如果你是白嫖的euserv服务器、访问速度会很慢
到这里、Artalk的部署就完成了、接下来是整合Butterfly主题
整合Butterfly主题
在主题目录下的配置
注意: 下面的 Butterfly 为主题名
在Butterfly\layout\includes\third-party\comments下创建Artalk.pug
配置为Butterfly主题dev分支最新版、其他版本谨慎使用
1 | - let option = theme.artalk.option ? JSON.stringify(theme.artalk.option) : false |
修改Butterfly\layout\includes\third-party\comments\index.pug、 case name处添加
1 | when 'Artalk' |
修改Butterfly\layout\includes\third-party\comments\js.pug、 case name处添加
1 | when 'Artalk' |
_config.butterfly.yml的配置
修改在_config.butterfly.yml
gcore 下添加:
这里的js和css是来自: https://github.com/monsterxcn/Artalk/tree/master/dist 、适配了深色模式
当然你也可以使用原版的:https://github.com/qwqcode/Artalk/tree/master/dist
1 | # comments |
在评论有关处添加(根据自己的需求修改配置):
1 | # artalk |
修改 comments 、添加 Artalk
1 | comments: |
表情配置
在source\_data下创建artalk.json内容、格式如下
1 | { |
例如:
1 | { |
最新评论配置
Butterfly 主题侧栏添加显示 Artalk 最新评论 参考的这篇文章: https://qzkyl.ml/posts/23786.html
首先我们需要在服务器上配置
进入
/www/wwwroot/ArtalkServerPhp/public目录、创建comments.php、由于不会php、代码都是百度来的、写的比较菜1
2
3
4
5
6
7
8
9
10
11
12
13
14
15
16
17
18
19
20
21
22
23
24
25
26
27
28
29
30
31
32
33
34
35
36
37
header('Content-Type:application/json');
$origin = isset($_SERVER['HTTP_ORIGIN'])? $_SERVER['HTTP_ORIGIN'] : '';
$allow_origin = array(
// 或 '*' 跨域无限制
'*'
);
if(in_array('*', $allow_origin)){
header('Access-Control-Allow-Origin:*');
}
else if(in_array($origin, $allow_origin)){
header('Access-Control-Allow-Origin:'.$origin);
}
$json_data = json_decode(file_get_contents('./../data/comments.data.json'), true);
$comments= array();
foreach($json_data as $data){
$avatar = md5(strtolower(($data['email'])));
$comment = array(
"content" => $data['content'],
"nick" => $data['nick'],
"page_key" => $data['page_key'],
"date" => $data['date'],
"avatar" => 'https://cn.gravatar.com/avatar/'.$avatar.'?d=mp',
);
array_push($comments,$comment);
}
$json = json_encode(($comments));
echo $json;然后我们访问这个地址
https://xxx.xxx.xxx/comments.php、 可以看到json数据回到Butterfly主题
进入
Butterfly/layout/includes/third-party/newest-comments,新建artalk-comment.pug文件1
2
3
4
5
6
7
8
9
10
11
12
13
14
15
16
17
18
19
20
21
22
23
24
25
26
27
28
29
30
31
32
33
34
35
36
37
38
39
40
41
42
43
44
45
46
47
48
49
50
51
52
53
54
55
56
57
58
59
60
61
62
63
64
65
66
67
68
69
70
71
72
73
74
75
76
77
78
79script.
window.addEventListener('load', () => {
const changeContent = (content) => {
if (content === '') return content
content = content.replace(/<img.*?src="(.*?)"?[^\>]+>/ig, '[!{_p("aside.card_newest_comments.image")}]') // replace image link
content = content.replace(/<a[^>]+?href=["']?([^"']+)["']?[^>]*>([^<]+)<\/a>/gi, '[!{_p("aside.card_newest_comments.link")}]') // replace url
content = content.replace(/<code>.*?<\/code>/gi, '[!{_p("aside.card_newest_comments.code")}]') // replace code
content = content.replace(/<[^>]+>/g,"") // remove html tag
if (content.length > 150) {
content = content.substring(0,150) + '...'
}
return content
}
const getComment = () => {
fetch('!{theme.newest_comments.artalk.dataUrl}')
.then(response => response.json())
.then(data => {
data.sort(function(x,y){return (x.date < y.date) ? 1 : -1})
const artalkArray = data.map(item => {
return {
'content': changeContent(item.content),
'nick': item.nick,
'avatar': item.avatar,
'url': item.page_key,
'date': item.date,
}
})
saveToLocal.set('artalk-newest-comments', JSON.stringify(artalkArray), !{theme.newest_comments.storage}/(60*24))
generateHtml(githubArray)
}).catch(e => {
const $dom = document.querySelector('#card-newest-comments .aside-list')
$dom.innerHTML= "!{_p('aside.card_newest_comments.error')}"
})
}
const generateHtml = array => {
let result = ''
if (array.length) {
for (let i = 0; i < array.length; i++) {
result += '<div class=\'aside-list-item\'>'
if (!{theme.newest_comments.avatar}) {
const name = '!{theme.lazyload.enable ? "data-lazy-src" : "src"}'
result += `<a href='${array[i].url}' class='thumbnail'><img ${name}='${array[i].avatar}' alt='${array[i].nick}'></a>`
}
result += `<div class='content'>
<a class='comment' href='${array[i].url}'>${array[i].content}</a>
<div class='name'><span>${array[i].nick}</span><time> / ${btf.diffDate(array[i].date, true)}</time></div>
</div></div>`
}
} else {
result += '!{_p("aside.card_newest_comments.zero")}'
}
let $dom = document.querySelector('#card-newest-comments .aside-list')
$dom.innerHTML= result
window.lazyLoadInstance && window.lazyLoadInstance.update()
window.pjax && window.pjax.refresh($dom)
}
const newestCommentInit = () => {
if (document.querySelector('#card-newest-comments .aside-list')) {
const data = saveToLocal.get('artalk-newest-comments')
if (data) {
generateHtml(JSON.parse(data))
} else {
getComment()
}
}
}
newestCommentInit()
document.addEventListener('pjax:complete', newestCommentInit)
})打开
Butterfly/layout/includes/third-party/newest-comments/index.pug文件将代码添加至末尾,添加后的代码如下
1
2
3
4
5
6
7
8
9
10if theme.newest_comments.leancloud.enable
include ./leancloud.pug
else if theme.newest_comments.github_issues.enable
include ./github-issues.pug
else if theme.newest_comments.disqus.enable
include ./disqus-comment.pug
else if theme.newest_comments.twikoo
include ./twikoo-comment.pug
else if theme.newest_comments.artalk.enable
include ./artalk-comment.pug打开主题配置
_config.yml文件,找到到newest_comments处添加
Artalk参数代码1
2
3artalk:
enable: true
dataUrl: https://xxx.xxx.xxx/comments.php参数 解释 enable 是否启用 Artalk 最新评论显示 dataUrl 评论数据Url地址
Demo
这里我通过下面的白嫖教程使用 000webhost 访问速度可能很慢
Demo: 没有了
获取最新评论: 没有了
你可以去测试一下,跨域均设置为'*'
管理员用户名:?
管理员邮箱:?@?.?
管理员密码:?
总结
自己操作的时候、Cloudflare的配置花了我比较多的时间(域名解析、Cloudflare的配置)
但是最终还是都解决了、希望这篇文章可以帮助到你!!!
参考:
其他白嫖教程:
- 支付宝
- 微信